

How To Turn On Autocorrect On Windows 10

Though many modern applications provide an in-built spell checker, many don't. This even the example with some Microsoft applications such as WordPad and Notepad, to reduce their footprint. Thankfully, you can plow on the Windows 10 spell check feature, which will provide autocorrect and suggestions for not just Notepad, simply your entire system.
Unfortunately, all the kinks oasis't been ironed out of the spell checker. Some may find information technology doesn't work properly in sure applications or that its interface gets in the way. As a result, we'll too be showing you lot how to turn on spell check in Windows ten, only likewise how to disable it.
To be clear, spell cheque shows dotted cherry lines under misspelled words and shows suggestions for changes. Autocorrect is a bit more than aggressive, irresolute words itself where it thinks there'south little chance the user intended to spell them that way.
Nosotros're going to be showing two methods to turn Windows autocorrect and spellcheck on or off: via the settings menu, and through the registry. The settings path is the simplest and easiest, simply the registry has more chance to persist across updates. Just brand sure you read our safe registry editing guide beginning.
How to Plough on/off Windows 10 Spell Check and Autocorrect via Settings
Though they're usually turned off by default, you tin enable these features speedily via Windows Settings.
- Open up Windows Settings
Printing the "Start" button, so click the settings cog in the bottom left corner, in a higher place the power button.
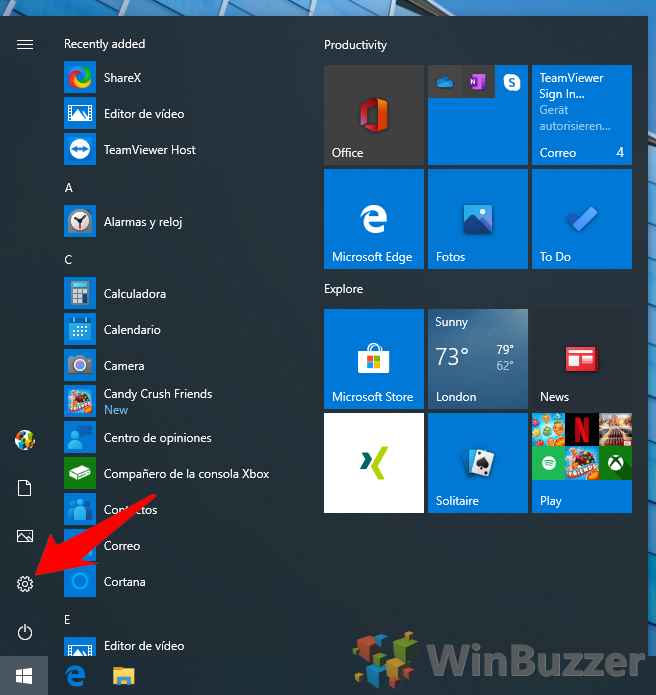
- Click the "Devices" heading
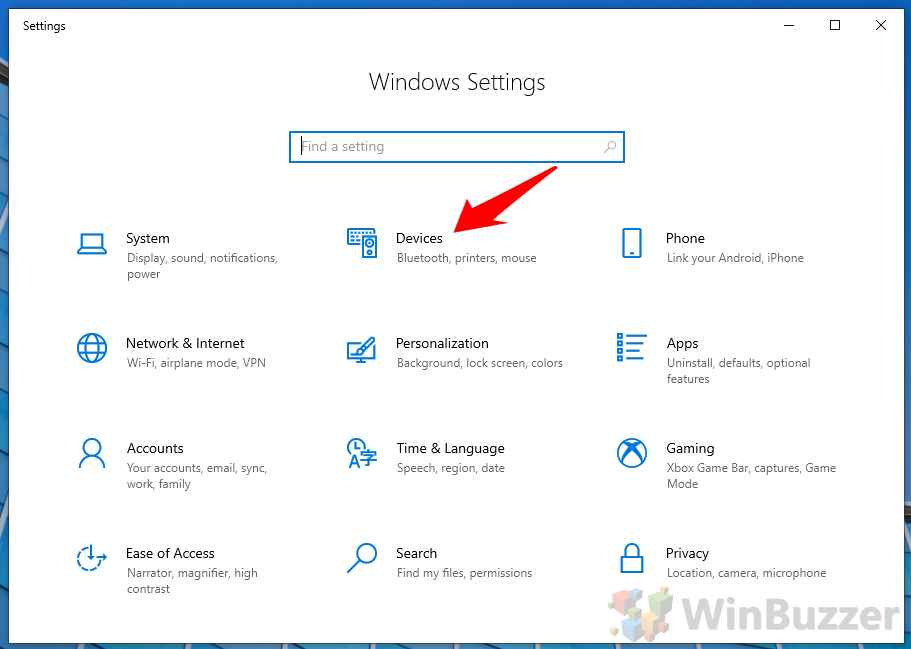
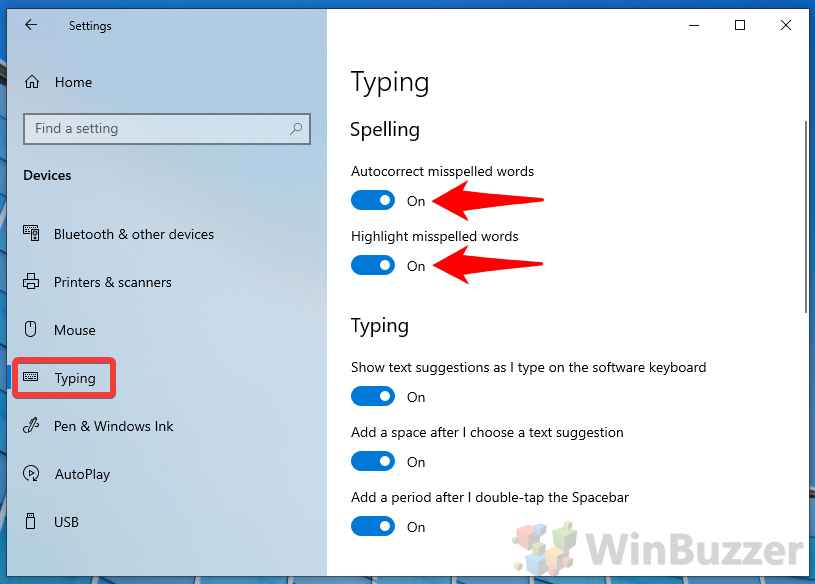
- Open the "Typing" menu and turn on or off Windows x spell check and Windows autocorrect
Windows autocorrect can exist enabled/disabled via the "Autocorrect misspelled words" heading, under "Spelling". There you can besides notice "Highlight misspelled words", which is the Windows 10 spell checker option.
How to Enable Windows 10 Autocorrect via the Registry Editor
For a more than permanent solution, or if y'all just aren't a fan of the Windows 10 Settings interface, you lot can use the registry editor.
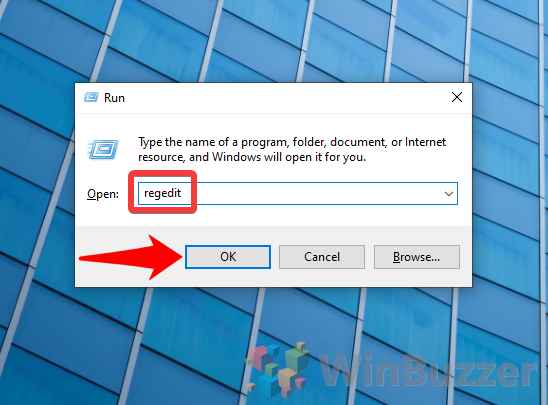
- Run regedit
Press "Windows + R" to open the Run dialog, type "regedit", and press "OK".

- Navigate to the Windows typing settings registry key and create a new DWORD (32-fleck)
In the Registry Editor address bar, paste
Figurer\HKEY_CURRENT_USER\SOFTWARE\Microsoft\TabletTip\1.vii. In the main pane, right-click any empty space and select "New > DWORD (32-chip) Value". If prompted, name it "EnableAutocorrection".
- Turn Windows autocorrect on or off
Double click the DWORD to open up the properties window, then modify the "Value data" to your choosing:
1 = Enable Windows autocorrect
0 = Disable Windows autocorrectRemoving the registry key will have your PC follow the system settings one time more. Once you're done modifying, click "OK".

How to Turn on Spellcheck in Windows 10 via the Registry or Disable information technology
As you'd expect, the Windows 10 spellcheck feature requires its own registry key. Thankfully, it'due south in the same location as the last, so you can skip straight to pace 3 if you're already at that place.
- Open Windows 10 Registry Editor
Press "Windows + R" to open the Run box, typing "regedit" and pressing "Enter" or "OK".
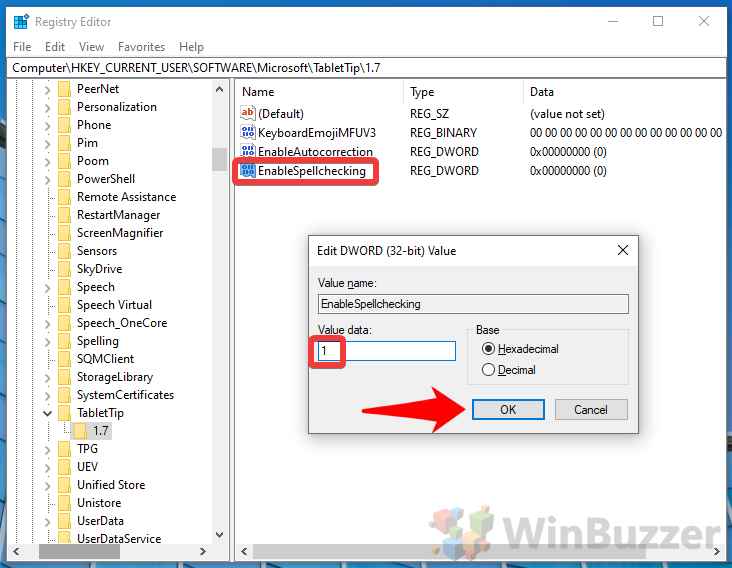
- Navigate to the TabletTip 1.vii registry key and create a new DWORD (32-bit)
Paste the post-obit into your address bar:
Estimator\HKEY_CURRENT_USER\SOFTWARE\Microsoft\TabletTip\1.7. Right-click the white infinite in the main pane and select "New > DWORD (32-bit)".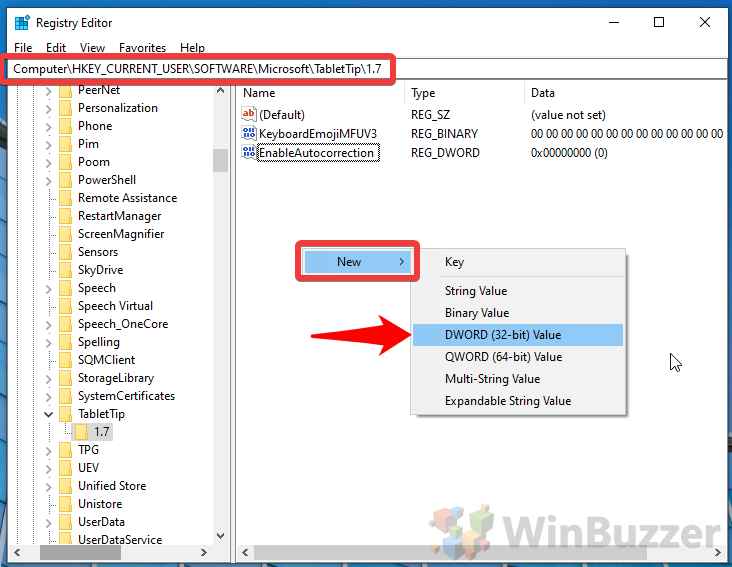
- Plough on spell check on Windows 10 or disable spell check
When prompted, proper name the DWORD "Enable Spellchecking". Double-click it open the properties interface and change the value information to one of the following:
1 = Enable Windows spell checker
0 = Disable Windows spell checkerDeleting the registry cardinal will accept your computer follow the system settings.
Source: https://winbuzzer.com/2020/07/24/how-to-turn-windows-10-spell-check-and-windows-autocorrect-on-or-off-xcxwbt/
Posted by: cruzglas1952.blogspot.com
0 Response to "How To Turn On Autocorrect On Windows 10"
Post a Comment